· Serhii Siryk · Frontend Development · 11 min read
Ngrx-forms: creating complex forms with Angular

Introduction
Creating complex forms might be a challenging activity for every front-end developer, no matter what framework they use. For sure, there’re lots of various ways to create forms using modern front-end frameworks. Thus, with latest Angular (6.x) you can create “template driven” and “model driven” or reactive forms out of the box, which is quite something if you want to build simple forms. But what if your forms consist of multiple sub-forms, many inputs depend on each other, their validation rules might dynamically change, etc.? While developing software for the insurance industry, where forms are the crucial part Scalified team has gained a great experience of implementing powerful forms and today we’ll share some experience of how to build really reactive forms with Angular and ngrx-forms.
Real-world forms, what are they?
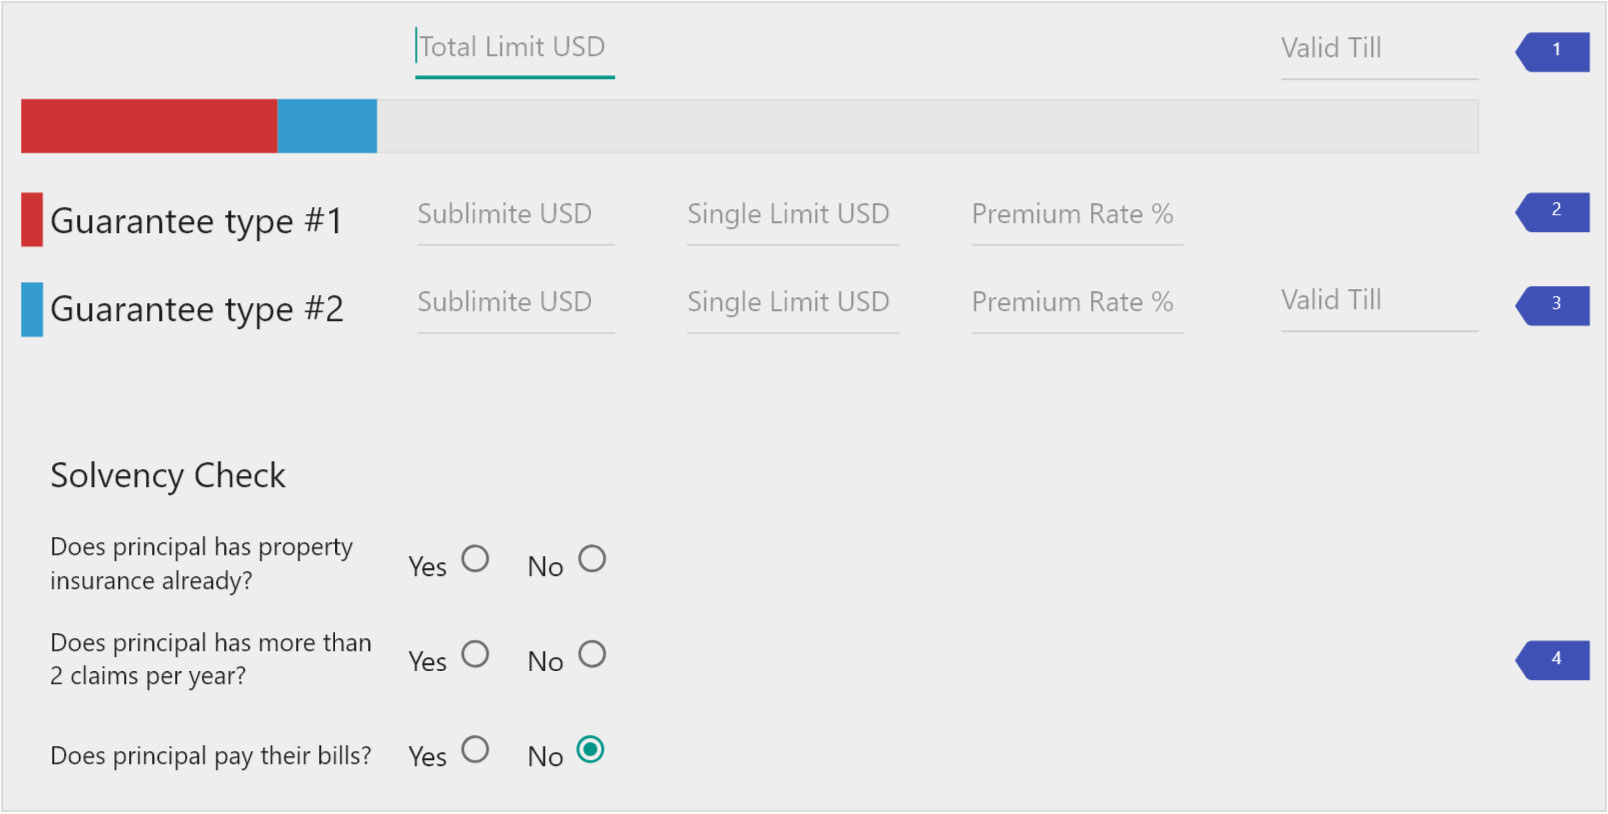
Before we start looking at some code, lets consider the example of requirements we might have for a real-world form.

The picture above illustrates the example of the form with four input groups: overallLimit (1), workLimit (2), criticalLimit (3), solvency (4). Some of the fields are required, some of them have simple validation rules, like “the date must be in the future only”, “the value must be greater or equal to 0”. In this example we call a validation rule “simple” if it depends only on a single input and it’s value. But sometimes we have dependent fields, for example:
- “Sublimite” fields in workLimit (2), criticalLimit (3) groups must not be greater than total limit in overallLimit (1) input group.
- “Valid Till” in criticalLimit (3) group must not be greater than “Valid Till” in overallLimit (1).
- “Single Limit” fields in workLimit (2), criticalLimit (3) groups must not be greater than “Sublimite” in the corresponding group.
There’s also another option of such dependencies: some fields are required if some condition is passed. The conditions might vary, lets say:
- radio-buttons in solvency (4) group are required if “Total Limit” in overallLimit (1) group is more than 1 000 000.
Business Rules
All right, so now we understand how different fields validity might depend on other fields. But sometimes we don’t need form to be invalid because of some values, it just has to inform user about some risky values as it’s usually needed in the insurance software. This kind of tips might be based on a lot more complicated business rules, for example:
- Whenever “Total limit USD” > 25000 and “Valid Till” > “Debt enforcement” issue date + 5 months – form should inform user that it’s risky to establish a limit, because of outdated Debt Enforcement Information paper
- Whenever “Total limit USD” >= 25000 and (“Valid till” <= “Debt enforcement” issue date + 5 months) and ((“Sum of debt enforcement” > 10000) or (“Number of debt enforcement” > 20)) – form should tip user about risky quality of Debt Enforcement check. etc.
Another typical issue is to check validity or perform some business logic on the form differently for different users. For example, underwriters should not be informed about any of the tips mentioned above.
So, having some background of the domain, you might guess that it’s not really trivial to keep all the logic clean and simple. Whether you use template-driven or model-driven approach you might quickly end-up with overloaded views, controllers with lots of boilerplate code. And this is the place you might think of using a great ngrx-forms package.
ngrx-forms – a functional way of implementing complexity
First of all, as you can guess from it’s name ngrx-forms introduces a way to apply redux state management model to the world of forms in applications that are using Angular and ngrx. So, if it sounds unfamiliar – it’s a good time to it out. We, meanwhile, will continue, assuming you are already familiar with redux and ngrx.
The initial step to do when using ngrx-forms is to define a form’s state which is going to be saved into ngrx store. We’ll use several simple interfaces:
// corresponds to input-groups # 1,2,3 on the picture
export interface EditableLimit {
  limitValue: number;
  singleLimit?: number;
  limitValidToDate?: string;
  premiumRate?: number;
}

// some important data
export interface DebtEnforcementInfo {
  issueDate: string;
  debtEnforcementNumber: number;
  debtEnforcementSum: number;
}

// corresponds to input-groups # 4 on the picture
export interface Solvency {
  question1: boolean | '';
  question2: boolean | '';
  question3: boolean | '';
}

// corresponds to the whole form
export interface LimitsFormValue {
  overallLimit: EditableLimit;
  workLimit: EditableLimit;
  criticalLimit: EditableLimit;
  debtEnforcementInfo: DebtEnforcementInfo;
  solvency: Solvency;
}

export interface AppState {
someOtherField: {};
claims: Claim[];
limitsForm: FormGroupState<LimitsFormValue>;
}
Last one, LimitsFormValue, represent the whole form state, whereas first three represent input groups in our form. Besides, DebtEnforcementInfo represents some fields that can’t be manually changed but can be populated by an external action (file upload in our case).
Then we can define the initial state:
export const EDIT_LIMITS_FORM_ID = 'EditLimitsForm';
export const EDIT_LIMITS_FORM_INITIAL_VALUE : LimitsFormValue = {
  overallLimit: {
    limitValue: 25000,
    limitValidToDate: new Date().toISOString()
  },
  workLimit: {
    limitValue: 25000,
    singleLimit: 10000,
    premiumRate: 6
  },
  criticalLimit: {
    limitValue: 0,
    singleLimit: 0,
    limitValidToDate: null,
    premiumRate: 1.2
  },
  solvency: {
    question1: '',
    question2: '',
    question3: ''
  },
  debtEnforcementInfo: {
    issueDate: '',
    debtEnforcementSum: undefined,
    debtEnforcementNumber: undefined
  }
};
const initialState: AppState = {
  someOtherField: {},
  claims:[],
  limitsForm: createFormGroupState<LimitsFormValue>(EDIT_LIMITS_FORM_ID, EDIT_LIMITS_FORM_INITIAL_VALUE),
};
And reducer:
export function editLimitsFormReducer(store = initialState, action: Action): EditLimitsFormStore {
  // #1 - creating update functions and reducer function
  let updateFunctions = createFormStateUpdateFunctions(store.someOtherField);
  const formStateReducer = createFormGroupReducerWithUpdate(updateFunctions);

  // #2 - forming a new state
  let formState: FormGroupState<LimitsFormValue> = updateRecursive(formStateReducer(store.limitsGroupForm, action),
    ...businessRules(store.someOtherField, store.claims));

  // #3 - updating store
  if (formState !== store.limitsForm) {
    store = {...store, limitsForm: formState};
  }

  // #4 - processing ngrx actions
  switch (action.type) {
    case 'some action type':
      // modify state
      return store;

    default: {
      return store;
    }
  }
}
Let’s closely look at the code above.
Block #1 is responsible for creating a reducer function. It is a function that first applies an action to the state and afterwards applies all given update functions one after another to the resulting form group state. The mentioned update functions are defined by factory method createFormStateUpdateFunctions and this is the main place where our validation logic is defined. We’ll get to it a little bit later.
Block #2 uses updateRecursive function of ngrx-forms to apply some more update functions that are separated from validation logic. We call them business rules here, though technically these are still some ngrx-forms “update functions” that just don’t affect validity of the form. We’ll use them to implement important tips described in our requirements above.
Blocks #3,4 is typical code for most ngrx reducers, so no explanations are needed here.
Validations
We already noticed createFormStateUpdateFunctions function that returns an object containing our validation rules. Lets have a look at it:
export const createFormStateUpdateFunctions = (): StateUpdateFns<LimitsFormValue> => ({
  overallLimit: updateGroup<EditableLimit>({
    limitValue: (state, parent) => {
      return validate([
        required,
        greaterThanOrEqualTo(0)
      ], state)
    },
    limitValidToDate: (state) => validate([
      required,
      greaterThanNowPlus(0, "day")(state)
    ], state)
  }),
  workLimit: (workLimitState, rootState) => updateGroup<EditableLimit>(cast(workLimitState), {
    limitValue: validate([
      required,
      greaterThanOrEqualTo(0),
      lessThanOrEqualTo(rootState.value.overallLimit.limitValue)
    ]),
    singleLimit: (state, parent) => validate([
      required,
      greaterThanOrEqualTo(0),
      lessThanOrEqualTo(parent.value.limitValue)
    ], state),
    premiumRate: validate([
      required,
      greaterThan(0),
      lessThanOrEqualTo(1000)
    ]),
  }),
  criticalLimit: (criticalLimitState, rootState) => updateGroup<EditableLimit>(cast(criticalLimitState), {
    limitValue: validate([
      required,
      greaterThanOrEqualTo(0),
      lessThanOrEqualTo(rootState.value.overallLimit.limitValue)
    ]),
    singleLimit: (state, parent) => validate([
      required,
      greaterThanOrEqualTo(0),
      lessThanOrEqualTo(parent.value.limitValue)
    ], state),
    premiumRate: validate([
      required,
      greaterThan(0),
      lessThanOrEqualTo(1000)
    ]),
    limitValidToDate: (state) => validate([
      greaterThanNowPlus(0, "day")(state),
      lessOrEqualToADate(rootState.value.overallLimit.limitValidToDate)(state)
    ], state)
  }),
  solvency: updateGroup<Solvency>({
    question1: validate(required),
    question2: validate(required),
    question3: validate(required)
  }),
  debtEnforcementInfo: (debtEnforcementInfoState, rootState) => updateGroup<DebtEnforcementInfo>(cast(debtEnforcementInfoState), {
    debtEnforcementNumber: validate([
      requiredIf((value) => rootState.value.overallLimit.limitValue > EDIT_LIMITS_FORM_INITIAL_VALUE.overallLimit.limitValue)
    ]),
    debtEnforcementSum: validate([
      requiredIf((value) => rootState.value.overallLimit.limitValue > EDIT_LIMITS_FORM_INITIAL_VALUE.overallLimit.limitValue)
    ]),
    issueDate: validate([
      requiredIf((value) => rootState.value.overallLimit.limitValue > EDIT_LIMITS_FORM_INITIAL_VALUE.overallLimit.limitValue)
    ])
  })
});
Simple validation rules
As you can notice the structure of the returned object corresponds to the form’s state interface, it’s actually statically typed because it’s type is StateUpdateFns<LimitsFormValue> so typescript compiler won’t let you put some unknown property. Also you can see bunch of validation functions like required, greaterThanOrEqualTo, lessThanOrEqualTo, greaterThan, etc. There’re lots of others built-in functions and you can also easily write custom ones to execute any validation logic.
Dependent fields
While executing update functions ngrx-forms can pass parent state to the functions, so it’s very straightforward to access to any of the properties of the form’s state. Take a look at the code:
workLimit: (workLimitState, rootState) => updateGroup<EditableLimit>(cast(workLimitState), {
  limitValue: validate([
    required,
    greaterThanOrEqualTo(0),
    lessThanOrEqualTo(rootState.value.overallLimit.limitValue)
  ]),
  singleLimit: (state, parent) => validate([
    required,
    greaterThanOrEqualTo(0),
    lessThanOrEqualTo(parent.value.limitValue)
  ], state),
...
})
We’re using rootState parameter to access to the global state, and parent parameter will contain workLimit during execution. Absolutely clean and trivial!
Conditional validation
As we said you’re free to write custom validation functions. So we did to turn on conditional “required” validation:
declare type ExprFn<T> = (t: T) => boolean;

export function requiredIf<T>(expr: ExprFn<T>): (value: T | null) => ValidationErrors {
  return (value: T | null): ValidationErrors => {
    if (!expr(value)) {
      return {}
    }
    if (value !== null && (value as any).length !== 0) {
      return {};
    }
    return {
      required: {
        actual: value,
      },
    };
  }
}
Complex Business Rules
We’ve already looked at how to implement complex form validation using ngrx-forms. And now let’s move on to the special logic that we might need for our form. We call this logic “business rules” and for our requirements we’ll implement some useful business tips based on the form values. Besides, we will need to show these tips for some particular users only, depending on their permissions.
Basically, we don’t need to change the form’s value when our custom business logic is executed. But we need a way to save some custom information somewhere in the form for accessing it later from the view. Ngrx-forms comes with a built-in feature – “User Defined Properties” that allows to store additional metadata on a control. It perfectly fits to our needs so we’ll make use of it in our implementation.
Implementation
Remember our reducer with an updateRecursive call? First of all, updateRecursive takes a form group state and a variable number of update functions. It applies all update functions one after another to the state recursively. I.e., the function is applied to the state’s children, their children etc. So, as you can see we’re passing an array of functions there ...businessRules(store.someOtherField, store.claims).
Note that we’re using factory function businessRules to be able to parametrize our update functions with someOtherField and claims properties.
The businessRules function in a simplest form might look like this:
export let businessRules: (someOtherField: {}, claims: Claim[]) =>
  Array<ProjectFn2<AbstractControlState<any>, AbstractControlState<any>>> = (someOtherField, claims) => [
  checkMaxOverallLimit,
  checkTotalValidTill(someOtherField),
  checkWorkSingleLimitExceedsDefault,
  checkWorkPremiumRateNotDefault,
  checkCriticalPremiumRateNotDefault,
  checkCriticalSublimitExceedsDefault,
  solvencyCheckBoxIsNo,
  checkQualityOrDebtEnforcement(someOtherField)
];
where every function is responsible for updating particular “user defined property” depending on some business logic inside. For example:
let checkMaxOverallLimit = (state: AbstractControlState<EditableLimit["limitValue"]>, parent: AbstractControlState<EditableLimit>) => {
  return setUserDefinedProperty("maxOverallLimitExceeded", state.value > 1000000, state)
};

let solvencyCheckBoxIsNo = (state: AbstractControlState<any>, parent: AbstractControlState<any>) =>
  setUserDefinedProperty("solvencyCheckBoxIsNo", state.value === false, state);

...
Ok, but this implementation will execute every “update function” for every form control recursively which is wrong, so we must somehow stick the business rule to the form control. Here’s one of the possible solutions to do so: we can introduce a class called BusinessRule with a simple wrapper method that is going to execute the function behind the rule if it corresponds to some particular form control. Lets take a look:
class BusinessRule<T> {

  constructor(private _formId: string, readonly value: ProjectFn2<AbstractControlState<T>, AbstractControlState<any>>) {
  }

  applyTo(path: string): Rule<T> {
    return new Rule<T>(this._formId, (state, parent) => {
      if (`${this._formId}.${path}` === state.id) {
        return this.value(state, parent);
      } else return state;
    })
  }
}
...
The businessRules functions would transformed to:
export let businessRules: (someOtherField: {}, claims: Claim[]) =>
  Array<ProjectFn2<AbstractControlState<any>, AbstractControlState<any>>> = (someOtherField, claims) => [
  new Rule(EDIT_LIMITS_FORM_ID, checkMaxOverallLimit)
    .applyTo("overallLimit.limitValue").value,

  new Rule(EDIT_LIMITS_FORM_ID, checkTotalValidTill(someOtherField))
    .applyTo("overallLimit.limitValidToDate").value,

  new Rule(EDIT_LIMITS_FORM_ID, checkWorkSingleLimitExceedsDefault)
    .applyTo("workLimit.singleLimit").value,

  new Rule(EDIT_LIMITS_FORM_ID, checkWorkPremiumRateNotDefault)
    .applyTo("workLimit.premiumRate").value,

  new Rule(EDIT_LIMITS_FORM_ID, checkCriticalPremiumRateNotDefault)
    .applyTo("criticalLimit.premiumRate").value,

  new Rule(EDIT_LIMITS_FORM_ID, checkCriticalSublimitExceedsDefault)
    .applyTo("criticalLimit.limitValue").value,

  new Rule(EDIT_LIMITS_FORM_ID, solvencyCheckBoxIsNo)
    .applyTo("solvency.question1").value,

  new Rule(EDIT_LIMITS_FORM_ID, solvencyCheckBoxIsNo)
    .applyTo("solvency.question2").value,

  new Rule(EDIT_LIMITS_FORM_ID, solvencyCheckBoxIsNo)
    .applyTo("solvency.question3").value,

  new Rule(EDIT_LIMITS_FORM_ID, checkQualityOrDebtEnforcement(someOtherField))
    .applyTo("debtEnforcementInfo").value,
];
We could also adjust our BusinessRule class to work with user’s permissions as well, e.g. create a wrapper method that applies an update method only if some permission is present (or absent in our case):
class BusinessRule<T> {

  constructor(private _formId: string, readonly value: ProjectFn2<AbstractControlState<T>, AbstractControlState<any>>) {
  }

  ifNoPermission(permission: Permissions, claims: Claim[]) {
    return new Rule<T>(this._formId, (state, parent) => {
      let permissionExists =
          claims.find(x => x.type === ClaimTypes.permission && x.value === permission);
      if (!permissionExists) {
        return this.value(state, parent);
      } else return state;
    })
  }

  applyTo(path: string): Rule<T> {
    return new Rule<T>(this._formId, (state, parent) => {
      if (`${this._formId}.${path}` === state.id) {
        return this.value(state, parent);
      } else return state;
    })
  }
}
Finally, the businessRules list will be:
new Rule(EDIT_LIMITS_FORM_ID, checkMaxOverallLimit)
    .ifNoPermission(Permissions.approveLimits, claims)
    .applyTo("overallLimit.limitValue").value,
new Rule(EDIT_LIMITS_FORM_ID, checkTotalValidTill(someOtherField))
    .ifNoPermission(Permissions.approveLimits, claims)
    .applyTo("overallLimit.limitValidToDate").value,
    ...
So now we’ll have specific “user properties” defined for specific form controls that makes it pretty easy to use them in the views to display some tips.
Conclusion
As you’ve seen, complex forms might be pretty dynamic, having bunch of dependent validations and business logic inside. Fortunately, with help of ngrx-forms it’s pretty much easy to implement various use cases, starting from simple validations and ending with custom business rules. We hope you’ll find this article useful, please follow us on Facebook to watch for newest articles!


