· Vladyslav Hnes · Backend Development · 7 min read
Setting up Java EE CQRS project using Axon Framework
Introduction
Today, software development teams have lots of options to choose from, when it comes to programming methodologies, patters, paradigms, etc. The mainstream approach is to treat backend side as a CRUD data store.
But gradually, as your software product starts becoming more sophisticated you might consider moving away from that model. One of the alternative views on a process of an application development that you can pay attention to is CQRS.
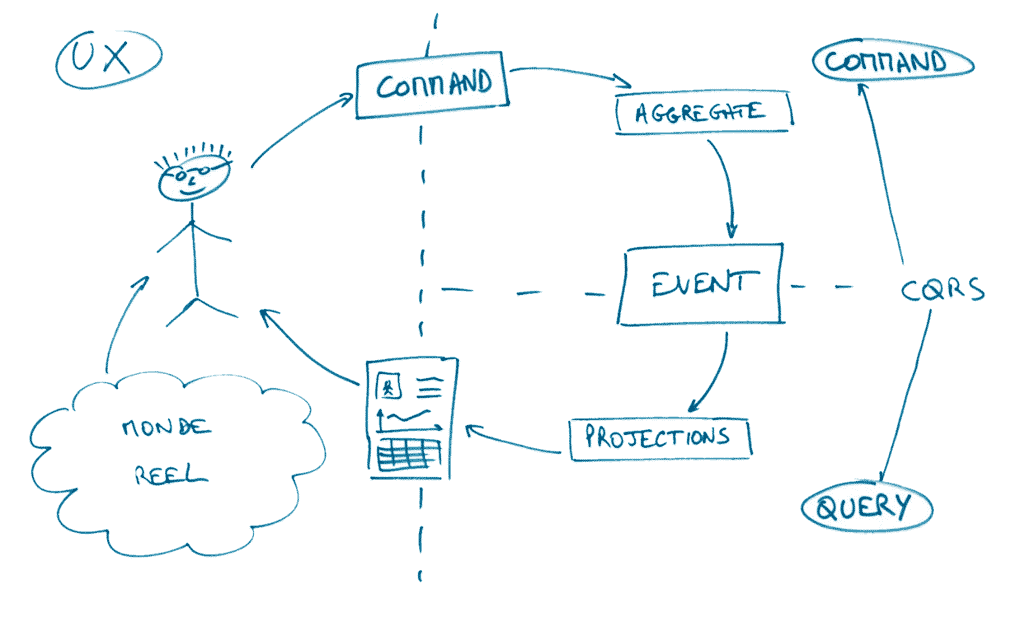
CQRS stands for Command Query Responsibility Segregation. It says that every method should either be a command that performs an action, or a query that returns data to the caller, but not both. By dividing methods into these two categories, you will have a better and clearer understanding of your domain model which will result in a higher performance and better scalability.
When it comes to choosing a Java framework for implementing CQRS pattern, an obvious choice would be Axon Framework. It’s free, convenient and has a big community. In fact, it’s the most popular Java framework for CQRS solutions. Axon Framework provides implementations of the most important building blocks, which allow you to focus entirely on a business logic.
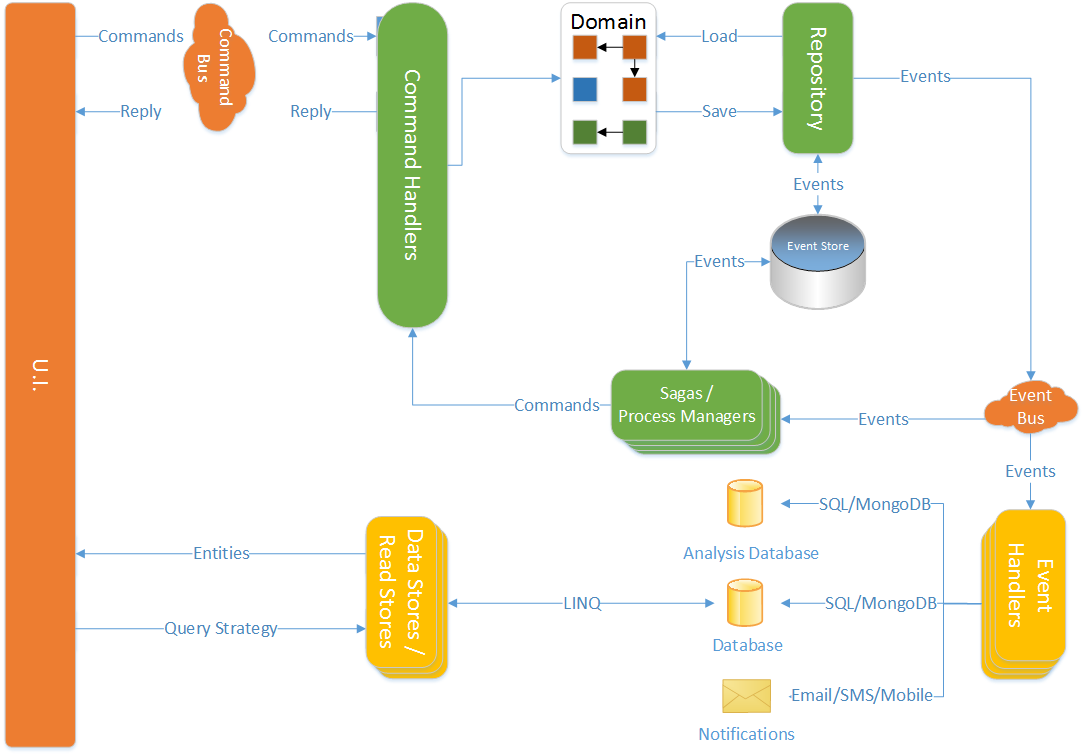
And in this article, we want to show how you can create and configure a simple J2EE project using Axon Framework.
CQRS Project Structure
Our default project structure usually looks like this:
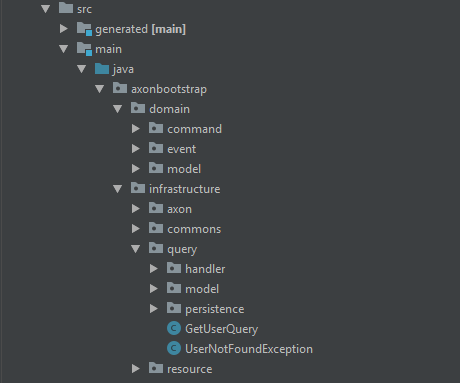
You can simply divide the whole application into two parts:
- domain
- infrastructure
Domain package consists of everything that concerns business logic. You can clearly see it, when you take a look at the domain’s sub-packages. We put commands in command’s package, events in event’s, aggregates and value-objects in model and service classes that help aggregates to interact with each other in service package.
Infrastructure in its turn includes classes for configuration, endpoints and query-side stuff.
The structure reflects the package’s essence. Axon package is for axon configuration, query package is for your queries and database concerns, resource is for endpoints.
Configuring Axon
Let’s take a look on the axon sub-package of the infrastructure package in our typical application.
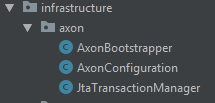
Here we have three classes for our configuration. Let’s start with the first one: AxonBootstrapper.java
@Slf4j
@Singleton
@Startup
public class AxonBootstrapper {

private Boolean started;

    @Inject
    private Configuration configuration;

    @PostConstruct
    private void start() {
        configuration.start();
        started = true;
        log.info("Started Axon configuration");
    }

    @PreDestroy
    private void shutdown() {
        if (started) {
            configuration.shutdown();
            started = false;
            log.info("Stopped Axon configuration");
        }
    }
}
This is a simple class that we need in order to start and stop our Axon Framework configuration.
Speaking of configuration itself, it looks like this: AxonConfiguration.java
@ApplicationScoped
public class AxonConfiguration {

    @Inject
    private TransactionManager transactionManager;

    @Inject
    private EventStorageEngine eventStorageEngine;

    @Inject
    private EventProcessingConfiguration eventProcessingConfiguration;

    @Inject
    private CommandBus commandBus;

    @Inject
    private QueryBus queryBus;

    @Produces
    @ApplicationScoped
    EventHandlingConfiguration produceEventHandlingConfiguration(
		UserForQueryEventHandler userForQueryEventHandler) {
        return new EventHandlingConfiguration()
                .registerEventHandler(conf -> userForQueryEventHandler);
    }

    @Produces
    @ApplicationScoped
    Configuration produceConfiguration(
		EventHandlingConfiguration eventHandlingConfiguration,
		UserQueryEventHandler userQueryEventHandler) {
        return DefaultConfigurer.defaultConfiguration()
                .configureTransactionManager(conf -> transactionManager)
                .configureEmbeddedEventStore(conf -> eventStorageEngine)
                .configureCommandBus(conf -> commandBus)
                .configureQueryBus(conf -> queryBus)
                .registerModule(eventProcessingConfiguration)
                .registerModule(eventHandlingConfiguration)
                .configureAggregate(AggregateConfigurer
                .defaultConfiguration(User.class))
                .registerQueryHandler(conf -> userQueryEventHandler)
                .buildConfiguration();
    }
}
First of all, we need to configure transaction manager. A transaction manager is an entity that manages transactions of all sorts, e.g. connections to external systems, opening database transactions. In this case our implementation of transaction manager is JtaTransactionManager(see JtaTransactionManager.java).
The next step would be to configure embedded event store. Basically, it’s just an entity that provides means to store and load events and it does it with a help of event storage engine that we’ve configured.
Also we add event processing configuration for working with events and event handling configuration where we add our events handlers for the read side. Another essential thing is a configuration of command and query buses. These are simply the mechanisms that dispatch command(query) objects to their appropriate command(query) handlers.
And for our simple example we’ll add aggregate configuration and assign query handler for fetching data.
And here’s our CDI class, so you have an idea where all those beans come from: CDISetup.java
@ApplicationScoped
public class CDISetup {

    @Produces
    Jpa jpa(EntityManager em) {
        return new JpaImpl(em);
    }

    @Produces
    EventStorageEngine produceEventStorageEngine(Serializer serializer, EntityManagerProvider provider) {
        return new JpaEventStorageEngine(serializer,
                null,
                new SQLStateResolver(),
                serializer,
                provider,
                NoTransactionManager.INSTANCE
        );
    }

    @Produces
    @ApplicationScoped
    Serializer produceSerializer() {
        return new JacksonSerializer();
    }

    @Produces
    @ApplicationScoped
    EntityManagerProvider produceEntityManagerProvider(EntityManager em) {
        ContainerManagedEntityManagerProvider provider = new ContainerManagedEntityManagerProvider();
        provider.setEntityManager(em);
        return provider;
    }

    @Produces
    @ApplicationScoped
    CommandBus producesCommandBus() {
        return new SimpleCommandBus();
    }

    @Produces
    @ApplicationScoped
    QueryBus producesQueryBus() {
        return new SimpleQueryBus();
    }

    @Produces
    @ApplicationScoped
    EventProcessingConfiguration producesEventProcessingConfiguration() {
        return new EventProcessingConfiguration();
    }

    @Produces
    @ApplicationScoped
    CommandGateway produceCommandGateway(Configuration configuration) {
        return configuration.commandGateway();
    }

    @Produces
    @ApplicationScoped
    QueryGateway produceQueryGateway(Configuration configuration) {
        return configuration.queryGateway();
    }

    @Produces
    @PersistenceContext(unitName = "bootstrapPU")
    EntityManager entityManger;

}
JtaTransactionManager.java
public class JtaTransactionManager implements TransactionManager {

    @Inject
    private UserTransaction transaction;

    @Override
    public Transaction startTransaction() {
        Unchecked.consumer(UserTransaction::begin).accept(transaction);
        return new JtaTransaction(transaction);
    }

    @AllArgsConstructor
    private static class JtaTransaction implements Transaction {

        private UserTransaction transaction;

        @Override
        public void commit() {
            Unchecked.consumer(UserTransaction::commit).accept(transaction);
        }

        @Override
        public void rollback() {
            Unchecked.consumer(UserTransaction::rollback).accept(transaction);
        }
    }
}
Simple Example of a CQRS JavaEE application
Let’s take a simple case for our example. We have User object, which has three fields: firstName, lastName and id. Our goal here is to implement command for creating a user and a query for retrieving it. What we are going to separate commands and queries, in other words – implement CQRS pattern. To begin with, let’s create a command which will create our user.
public class CreateUserCommand implements Serializable {

    private static final long serialVersionUID = 1L;

    @TargetAggregateIdentifier
    private UUID id;

    private String firstName;

    private String lastName;
}
Don’t forget to put @TargetAggreateIndentifier into field that’s going to be an id of an aggregate. Now, we can move to a creation of an aggregate itself.
@AggregateRoot
public class User implements Serializable {

    private static final long serialVersionUID = 1L;

    @AggregateIdentifier
    private UUID id;

    private String firstName;

    private String lastName;

    @CommandHandler
    public User(CreateUserCommand command) {
        apply(new UserCreatedEvent(command));
    }

    @EventSourcingHandler
    public void on(UserCreatedEvent event) {
        this.id = event.getId();
        this.firstName = event.getFirstName();
        this.lastName = event.getLastName();
    }
}
In order to create an aggregate class we put @AggregateRoot annotation. Also each aggregate needs to have an id field, and we specify this by using an @AggregateIdentifier annotation. You can also see a command and event sourcing handlers that we’ve already added, they are responsible for handling commands and events respectively.
So, our aggregate is created when CreateUserCommand arrives – receiving that command will produce a UserCreatedEvent, then the event will be handled in event sourcing handler which will in its turn update our aggregate.
The handler for updating query side is also needs to be created.
public class UserForQueryEventHandler {

    @EventHandler
    public void on(UserCreatedEvent event) {
        UserEntry entry = new UserEntry(event);
        //save implementation here
    }
}
Now, let’s create a query for retrieving our user by id:
public class GetUserQuery implements Serializable {

    private static final long serialVersionUID = 1L;

    private UUID id;
}
And a handler for it:
public class UserQueryEventHandler {

    @Inject
    private UserEntryQueryRepository userEntryQueryRepository;

    @QueryHandler
    public UserEntry on(GetUserQuery query) throws UserNotFoundException {
        //retrieving implementation
        return UserEntry.orElseThrow(UserNotFoundException::new);
    }
}
And the last thing would be to add REST HTTP endpoints for our command and query:
public class UserResourceImpl implements UserResource {

    @Inject
    private CommandGateway commandGateway;

    @Inject
    private QueryGateway queryGateway;

    @Override
    public Response getById(@NotNull String id) {
        GetUserQuery query = new GetUserQuery(UUID.fromString(id));
        return queryGateway.query(query, UserEntry.class)
                .thenApply(entity -> Response.ok(entity).build())
                .join();
    }

    @Override
    public Response create(@Valid CreateUserCommand command) {
        return commandGateway.send(command)
                .thenApply(result -> Response.accepted().build())
                .join();
    }
}
Here’s how a script for creating tables in Oracle database looks like:
CREATE SEQUENCE HIBERNATE_SEQUENCE;

CREATE TABLE DOMAIN_EVENT_ENTRY (
  GLOBAL_INDEX         NUMBER(19)         NOT NULL,
  EVENT_IDENTIFIER     VARCHAR2(255 CHAR) NOT NULL,
  META_DATA            BLOB,
  PAYLOAD              BLOB               NOT NULL,
  PAYLOAD_REVISION     VARCHAR2(255 CHAR),
  PAYLOAD_TYPE         VARCHAR2(255 CHAR) NOT NULL,
  TIME_STAMP           VARCHAR2(255 CHAR) NOT NULL,
  AGGREGATE_IDENTIFIER VARCHAR2(255 CHAR) NOT NULL,
  SEQUENCE_NUMBER      NUMBER(19)         NOT NULL,
  TYPE                 VARCHAR2(255 CHAR),

  CONSTRAINT DOMEVNTENTR_PK PRIMARY KEY (GLOBAL_INDEX),
  CONSTRAINT DOMEVNTENTR_EVNTID_UNQ UNIQUE (EVENT_IDENTIFIER),
  CONSTRAINT DOMEVNTENTR_AGRIDSQNN_UNQ UNIQUE (AGGREGATE_IDENTIFIER, SEQUENCE_NUMBER)
);

CREATE TABLE USER_ENTRY
(
  ID           RAW(255)     NOT NULL,
  FIRST_NAME   VARCHAR(255) NOT NULL,
  LAST_NAME    VARCHAR(255) NOT NULL,

  CONSTRAINT USER_ENTRY_PK PRIMARY KEY (ID)
);
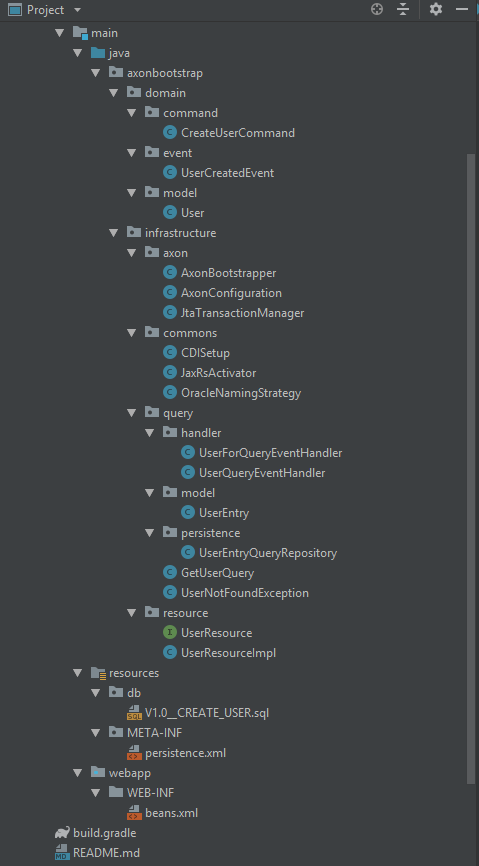
The structure of our typical project:
Conclusion
In this article, we introduced the Axon framework as a powerful tool for building CQRS web applications and built one by ourselves. We configured the framework for J2EE environment and implemented a simple command and a query.
Please share this article in social media if you find it useful! The full sources from above and our base project can be found over on our GitHub.


