· Serhii Siryk · Backend Development · 7 min read
Software Development in Cost-Effective Infrastructure

Introduction
While software development of big and small projects at Scalified we often have situations when development environment includes multiple nodes. Starting from Continuous Integration (CI) which is crucial for an effective development team and ending with dev/test/stage environments, every one of those nodes consumes some resources and therefore costs money.
The sad thing about this is that you can’t effectively develop qualitative software working in a team if you don’t use CI, auto deployments, static code analysis tools, etc. But do we really use all of the mentioned systems 24/7? Probably not, unless your development team is international which is rather rare case in outsource software development, you can make use of the fact that people usually tend to sleep at night and turn-off development environments at all 😉
It makes a real sense when using cloud-based providers like Amazon/Azure/Jelastic where you can use flexible pricing plans and pay for only consumed resources. So, in this article we’re going to show how can we automate our environments to be turned on/off according to a schedule and how much money it can save.
Preconditions
Let’s get started with defining the preconditions. We’ll use Jelastic cloud based hosting which supports Docker containers to be published in the cloud. Every Docker container can be used as separate node in the cloud, therefore we can easily manage each of them separately. Here’s the real environment configuration we use for one of our projects:
| Node Name | Cloudlets | Memory (up to) | CPU (up to) | Monthly Price (max, €) |
|---|---|---|---|---|
| CI server Teamcity | 6-8 | 1 GiB | 3.2 GHz | 10.5 |
| CI database Postgres | 7 | 896 MiB | 2.8 GHz | 9.2 |
| CI agent Teamcity Agent *3 | 1-17 | 2.12 GiB | 6.8 GHz | 21 (* 3) |
| Development Database Docker Oracle | 10-30 | 3.75 GiB | 12 GHz | 34.3 |
| TestCases & Requirements management tool SquashTM | 7-9 | 1.12 GiB | 3.6 GHz | 7.7 |
| App server – DEV Jboss | 11-15 | 1.87 GiB | 6 GHz | 14.8 |
| App server – TEST Jboss | 11-15 | 1.87 GiB | 6 GHz | 14.8 |
| Selenium for e2e tests Standalone Chrome | 2-9 | 1.25 GiB | 4 GHz | 12.7 |
As you can see, the maximum monthly cost for this configuration migh be 167€, assuming all the nodes consume max available resources 24/7, i.e. memory and CPU. Of course in real world it won’t be the case that memory and CPU are used so hard there, however we can take this number just to calculate how much we can save running servers for only 10h per day.
Say the average month has 30 days, and 24 hours in a day then 30 * 24 = 720 hours in an average month. Therefore, our configuration costs us 167 / 720 = 0.2319 per hour. Assuming we need our servers to be operating 10 hours per day, excluding weekends we’d need them: 5 business days in a week * 4 weeks in a month * 10 hours in a day = 200 hours in total. It’s great optimization, since now we can pay 200 * 0.2319 = 46.38€ max which is 3.6 times less than original price. Supposing CPU and memory are used ~70-80% in average, the price will be even less expensive. Great, so let’s take a look how can we do that.
Scheduler is Watching You
To do the main job we’ll need some blazing lite environment which is always running and doesn’t consume a lot. It will be responsible for starting/stopping nodes according to a configured schedule. We recommend using an Alpine docker image with pre-installed Cron. Alpine is fast and efficient Linux distribution and Cron is a well-known time-based job scheduler in Unix-like systems. Our real scheduler instance on Jelastic has up to 256MiB of memory, 800 MHz CPU and costs us less than 1.1€ max monthly.
So, now when we have scheduler running and we know that Cron can execute any command in a timely manner, we can wrap commands we need to be executed in a single shell script. The script will be only responsible for turning on/off nodes, but for sure we don’t wan’t to reinvent the cycle. That’s why we’re gonna make use of Jelastic command-line interface (Jelastic CLI) tool to to the job for us.
Make use of a CLI
The Jelastic CLI is a tool, designed to simplify interaction with your Cloud Platform account through executing the appropriate commands directly from any machine. It allows to handle the vast majority of available operations remotely, complementing the wide stack of capabilities, provided via dashboard and Jelastic API.
More details about Jelastic CLI you can find here:
Though Jelastic CLl allows us to do things easier within the cloud, it requires setup and some preparations to be performed before.
- First of all we need to setup Java 1.8:
sudo apk add --update --no-cache openjdk8
- After we have Java installed we can install Jelastic CLI itself:
$ sudo curl –s ftp://ftp.jelastic.com/pub/cli/jelastic-cli-installer.sh | bash
- Next step will be authenticating yourself in Jelastic cloud, it’s requited for CLI to execute it’s commands. It can be done manually, by just executing the following command:
~/jelastic/users/authentication/signin --login {email} --password {password} --platformUrl {platform_Url}
After successful authentication CLI will keep authentication token so that you don’t need to do this manual step frequently. However, if you don’t want to do it manually you can store login and password, e.g. in environment variables and automate this step as well.
Here’s the example of final script you can use for starting/stopping environments, it also supports automatic authentication on every run:
#!/bin/sh

JELASTIC_BIN=~/jelastic/environment/control
JELASTIC_AUTHENTICATION=~/jelastic/users/authentication
COMMAND_EXECUTION_TIMEOUT=45

login() {
  echo "[INFO][$(date -u)]: Starting Logging to the cloud ..."
  timeout ${COMMAND_EXECUTION_TIMEOUT} bash ${JELASTIC_AUTHENTICATION}/signin --login
  ${JELASTIC_LOGIN} --password ${JELASTIC_PASSWORD} --platformUrl app.mircloud.host --silent true

  if [ $? == 0 ]; then
     echo "[INFO][$(date -u)]: Successfully logged to the cloud"
    else
     echo "[INFO][$(date -u)]: Failed to log to the cloud"
    fi
}

start() {
  login

  for jelastic_environment in ${ENVIRONMENTS}
  do
    echo "[INFO][$(date -u)]: Starting ${jelastic_environment} environment"
    timeout ${COMMAND_EXECUTION_TIMEOUT} ${JELASTIC_BIN}/startenv --envName
    ${jelastic_environment} --silent true

    if [ $? == 0 ]; then
     echo "[INFO][$(date -u)]: Successfully started ${jelastic_environment}
      environment"
    else
     echo "[INFO][$(date -u)]: Failed to start ${jelastic_environment}
      environment in ${COMMAND_EXECUTION_TIMEOUT} seconds"
    fi

  done

}

stop() {
  login

  for jelastic_environment in ${ENVIRONMENTS}
  do
    echo "[INFO][$(date -u)]: Stopping ${jelastic_environment} environment"
    timeout ${COMMAND_EXECUTION_TIMEOUT} ${JELASTIC_BIN}/stopenv --envName
    ${jelastic_environment} --silent true

    if [ $? == 0 ]; then
     echo "[INFO][$(date -u)]: Successfully stopped ${jelastic_environment}
      environment"
    else
     echo "[INFO][$(date -u)]: Failed to stop ${jelastic_environment}
     environment in ${COMMAND_EXECUTION_TIMEOUT} seconds"
    fi
  done
}

$@
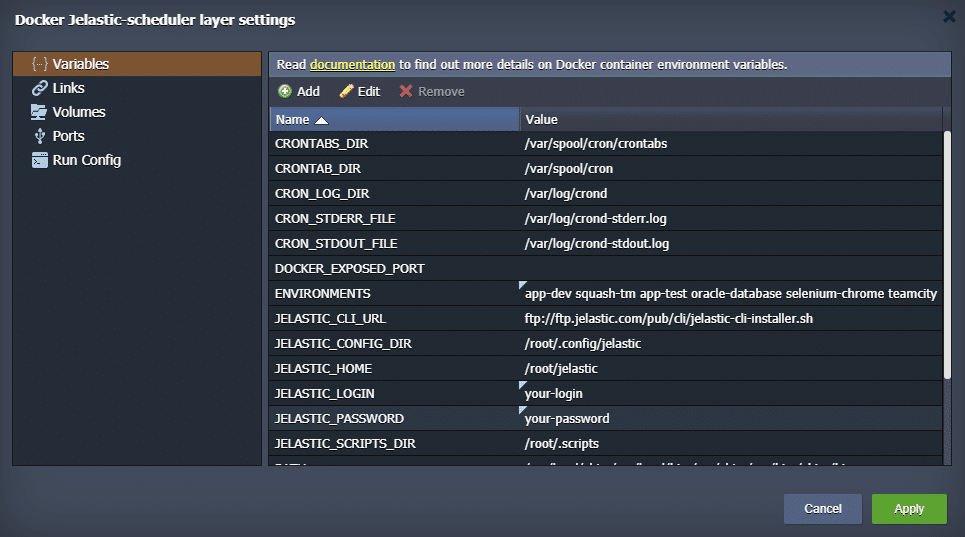
Note, that this script requires some system variables, such as ${ENVIRONMENTS}, ${JELASTIC_LOGIN}, ${JELASTIC_PASSWORD} to be pre-configured before execution. For example, first one is just space-separated list of Jelastic environments needed to be processed by start/stop command, e.g app-dev squash-tm app-test oracle-database selenium-chrome teamcity. It can be easily done by using Jelastic web UI like here:

Last step to make it work is to give permission for running the script:
$ chmod u+x script
Great, so now we can use the script to start/stop environments specified in ${ENVIRONMENTS}, variable. Just run the script providing corresponding parameter to check it out:
$ ./script start
$ ./script stop
Configuring the Schedule
The final step left is to configure Cron. To do it we need to create a crontab file to schedule automatic execution at the desired time.
The main root crontab file is located in /var/spool/cron/crontabs directory by default. In order to view and edit it, run the following command:
$ crontab –e
Now we need to configure when to execute our script:
TZ=UTC
00 21 * * 1-5 /path/to/script stop
00 09 * * 1-5 /path/to/script start
As you can see in this example configuration, our script will automatically shut down all servers at 21 PM and start them at 9 AM. On Saturday and Sunday, none of the commands will be executed.
What Next
As you can see, this simple and effective solution helps to reduce expenses on development infrastructure and increases profits from using modern cloud services. To make it even easier to use for real software development projects Scalified team have created a ready to use Docker image. If you use Jelastic you can grab it from Docker Store or create a fork to support cloud provider you use.


