
· Serhii Siryk · Frontend Development · 19 min de leitura
Ngrx-forms: criação de formulários complexos com Angular
Introdução
A criação de formulários complexos pode ser uma tarefa desafiante para qualquer programador front-end, independentemente da framework que utilize. De certeza que existem muitas formas de criar formulários com as frameworks front-end modernas. Assim, com o Angular mais recente (6.x) pode criar de imediato formulários “template driven” e “model driven” (ou reativos), o que é bastante útil se pretender construir formulários simples. Mas e se os seus formulários consistirem em vários subformulários, muitos campos dependerem uns dos outros, as respetivas regras de validação mudarem dinamicamente, etc.? Ao desenvolver software para o setor segurador, onde os formulários são a peça crucial, a equipa da Scalified ganhou uma vasta experiência na implementação de formulários poderosos e hoje vamos partilhar alguma dessa experiência sobre como criar formulários verdadeiramente reativos com Angular e ngrx-forms.
Formulários do mundo real, o que são?
Antes de começarmos a examinar código, consideremos o exemplo de requisitos que poderíamos ter para um formulário do mundo real.
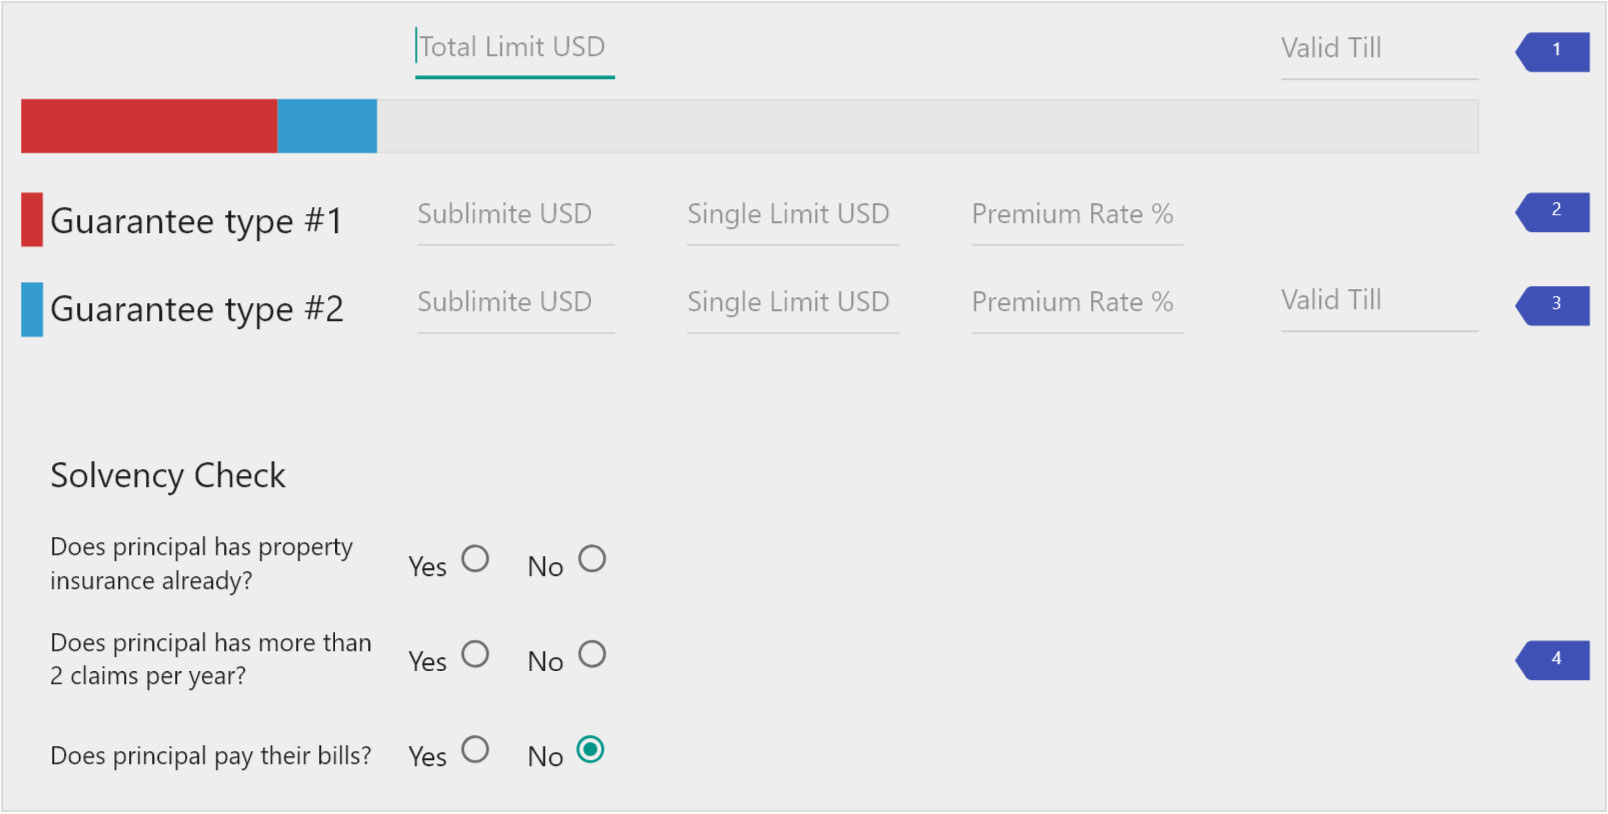
A imagem acima ilustra o exemplo do formulário com quatro grupos de campos: overallLimit (1), workLimit (2), criticalLimit (3), solvency (4). Alguns campos são obrigatórios, outros têm regras de validação simples, como “a data tem de ser apenas futura”, “o valor tem de ser maior ou igual a 0”. Neste exemplo, chamamos “simples” a uma regra de validação se esta depender apenas de um único campo e do respetivo valor. Mas por vezes temos campos dependentes, por exemplo:
- Os campos “Sublimite” nos grupos workLimit (2) e criticalLimit (3) não podem ser superiores ao limite total no grupo de campos overallLimit (1).
- O “Valid Till” no grupo criticalLimit (3) não pode ser superior ao “Valid Till” no overallLimit (1).
- Os campos “Single Limit” nos grupos workLimit (2) e criticalLimit (3) não podem ser superiores ao “Sublimite” do grupo correspondente.
Existe ainda outra variante destas dependências: alguns campos são obrigatórios se uma determinada condição se verificar. As condições podem variar, digamos:
- os botões de rádio no grupo solvency (4) são obrigatórios se o “Total Limit” no grupo overallLimit (1) for superior a 1 000 000.
Regras de Negócio
Muito bem, agora já percebemos como a validade de diferentes campos pode depender de outros campos. Mas por vezes não precisamos que o formulário seja inválido por causa de determinados valores; apenas tem de informar o utilizador sobre valores arriscados, como é habitual no software segurador. Este tipo de aviso pode basear-se em business rules bastante mais complicadas, por exemplo:
- Sempre que “Total limit USD” > 25000 e “Valid Till” > “Debt enforcement” issue date + 5 months – o formulário deve informar o utilizador que é arriscado estabelecer um limite, devido ao documento de execução de dívida desatualizado
- Sempre que “Total limit USD” >= 25000 e (“Valid till” <= “Debt enforcement” issue date + 5 months) e ((“Sum of debt enforcement” > 10000) ou (“Number of debt enforcement” > 20)) – o formulário deve alertar o utilizador para a qualidade arriscada da verificação de execução de dívida. etc.
Outra questão típica é verificar a validade ou executar alguma lógica de negócio no formulário de forma diferente para diferentes utilizadores. Por exemplo, os subscritores (underwriters) não devem ser informados sobre nenhum dos avisos mencionados acima.
Assim, com algum conhecimento do domínio, pode imaginar que não é nada trivial manter toda a lógica limpa e simples. Quer utilize a abordagem template-driven quer a model-driven, pode rapidamente acabar com vistas sobrecarregadas e controladores com muito código repetitivo (boilerplate). E é aqui que pode pensar em utilizar o excelente pacote ngrx-forms.
ngrx-forms – uma forma funcional de implementar complexidade
Em primeiro lugar, como pode adivinhar pelo nome, ngrx-forms introduz uma forma de aplicar o modelo de gestão de estado redux ao mundo dos formulários em aplicações que utilizam Angular e ngrx. Portanto, se lhe parecer desconhecido, é boa altura para experimentar. Entretanto, vamos continuar, assumindo que já conhece redux e ngrx.
O passo inicial ao utilizar ngrx-forms é definir o estado do formulário, que será guardado na store ngrx. Vamos utilizar várias interfaces simples:
lang: ‘en’ publishDate: 2018-06-25T00:00:00Z author: Serhii Siryk title: ‘Ngrx-forms: creating complex forms with Angular’ excerpt: “Today we’ll share a real-life example from the insurance industry showing how to build really reactive forms with Angular and ngrx-forms.” image: ‘/images/posts/complex-forms-angular-ngrx-forms/ngrx-forms-image.png’ category: Frontend Development tags:
- angular
- dynamic validation
- ngrx-forms
- software development metadata: slug: complex-forms-angular-ngrx-forms breadcrumbs:
- url: / title: site.title type: WebPage
- url: page.url title: page.title type: Article rating: 4.8 reviewsCount: 25 draft: false
Introduction
Creating complex forms might be a challenging activity for every front-end developer, no matter what framework they use. For sure, there’re lots of various ways to create forms using modern front-end frameworks. Thus, with the latest Angular (6.x) you can create “template driven” and “model driven” or reactive forms out of the box, which is quite something if you want to build simple forms. But what if your forms consist of multiple sub-forms, many inputs depend on each other, their validation rules might dynamically change, etc.? While developing software for the insurance industry, where forms are the crucial part, the Scalified team has gained a great experience of implementing powerful forms and today we’ll share some experience of how to build really reactive forms with Angular and ngrx-forms.
Real-world forms, what are they?
Before we start looking at some code, let’s consider the example of requirements we might have for a real-world form.
The picture above illustrates the example of the form with four input groups: overallLimit (1), workLimit (2), criticalLimit (3), solvency (4). Some of the fields are required, some of them have simple validation rules, like “the date must be in the future only”, “the value must be greater or equal to 0”. In this example we call a validation rule “simple” if it depends only on a single input and its value. But sometimes we have dependent fields, for example:
- “Sublimite” fields in workLimit (2), criticalLimit (3) groups must not be greater than total limit in overallLimit (1) input group.
- “Valid Till” in criticalLimit (3) group must not be greater than “Valid Till” in overallLimit (1).
- “Single Limit” fields in workLimit (2), criticalLimit (3) groups must not be greater than “Sublimite” in the corresponding group.
There’s also another option of such dependencies: some fields are required if some condition is passed. The conditions might vary, let’s say:
- radio-buttons in solvency (4) group are required if “Total Limit” in overallLimit (1) group is more than 1 000 000.
Business Rules
All right, so now we understand how different fields validity might depend on other fields. But sometimes we don’t need the form to be invalid because of some values, it just has to inform the user about some risky values as it’s usually needed in the insurance software. This kind of tip might be based on a lot more complicated business rules, for example:
- Whenever “Total limit USD” > 25000 and “Valid Till” > “Debt enforcement” issue date + 5 months – the form should inform the user that it’s risky to establish a limit, because of outdated Debt Enforcement Information paper
- Whenever “Total limit USD” >= 25000 and (“Valid till” <= “Debt enforcement” issue date + 5 months) and ((“Sum of debt enforcement” > 10000) or (“Number of debt enforcement” > 20)) – the form should tip the user about the risky quality of Debt Enforcement check. etc.
Another typical issue is to check validity or perform some business logic on the form differently for different users. For example, underwriters should not be informed about any of the tips mentioned above.
So, having some background of the domain, you might guess that it’s not really trivial to keep all the logic clean and simple. Whether you use template-driven or model-driven approach you might quickly end up with overloaded views, controllers with lots of boilerplate code. And this is the place you might think of using a great ngrx-forms package.
ngrx-forms – a functional way of implementing complexity
First of all, as you can guess from its name ngrx-forms introduces a way to apply redux state management model to the world of forms in applications that are using Angular and ngrx. So, if it sounds unfamiliar – it’s a good time to try it out. We, meanwhile, will continue, assuming you are already familiar with redux and ngrx.
The initial step to do when using ngrx-forms is to define a form’s state which is going to be saved into ngrx store. We’ll use several simple interfaces:
// corresponds to input-groups # 1,2,3 on the picture
export interface EditableLimit {
  limitValue: number;
  singleLimit?: number;
  limitValidToDate?: string;
  premiumRate?: number;
}

// some important data
export interface DebtEnforcementInfo {
  issueDate: string;
  debtEnforcementNumber: number;
  debtEnforcementSum: number;
}

// corresponds to input-groups # 4 on the picture
export interface Solvency {
  question1: boolean | '';
  question2: boolean | '';
  question3: boolean | '';
}

// corresponds to the whole form
export interface LimitsFormValue {
  overallLimit: EditableLimit;
  workLimit: EditableLimit;
  criticalLimit: EditableLimit;
  debtEnforcementInfo: DebtEnforcementInfo;
  solvency: Solvency;
}

export interface AppState {
  someOtherField: {};
  claims: Claim[];
  limitsForm: FormGroupState<LimitsFormValue>;
}
A última, LimitsFormValue, representa o estado de todo o formulário, enquanto as três primeiras representam grupos de campos no nosso formulário. Além disso, DebtEnforcementInfo representa alguns campos que não podem ser alterados manualmente, mas que podem ser preenchidos por uma ação externa (o carregamento de ficheiros, no nosso caso).
Em seguida, podemos definir o estado inicial:
The last one, LimitsFormValue, represents the whole form state, whereas the first three represent input groups in our form. Besides, DebtEnforcementInfo represents some fields that can’t be manually changed but can be populated by an external action (file upload in our case).
Then we can define the initial state:
export const EDIT_LIMITS_FORM_ID = 'EditLimitsForm';
export const EDIT_LIMITS_FORM_INITIAL_VALUE: LimitsFormValue = {
  overallLimit: {
    limitValue: 25000,
    limitValidToDate: new Date().toISOString(),
  },
  workLimit: {
    limitValue: 25000,
    singleLimit: 10000,
    premiumRate: 6,
  },
  criticalLimit: {
    limitValue: 0,
    singleLimit: 0,
    limitValidToDate: null,
    premiumRate: 1.2,
  },
  solvency: {
    question1: '',
    question2: '',
    question3: '',
  },
  debtEnforcementInfo: {
    issueDate: '',
    debtEnforcementSum: undefined,
    debtEnforcementNumber: undefined,
  },
};
const initialState: AppState = {
  someOtherField: {},
  claims: [],
  limitsForm: createFormGroupState<LimitsFormValue>(EDIT_LIMITS_FORM_ID, EDIT_LIMITS_FORM_INITIAL_VALUE),
};
E o reducer:
And reducer:
export function editLimitsFormReducer(store = initialState, action: Action): EditLimitsFormStore {
  // #1 - creating update functions and reducer function
  let updateFunctions = createFormStateUpdateFunctions(store.someOtherField);
  const formStateReducer = createFormGroupReducerWithUpdate(updateFunctions);

  // #2 - forming a new state
  let formState: FormGroupState<LimitsFormValue> = updateRecursive(
    formStateReducer(store.limitsGroupForm, action),
    ...businessRules(store.someOtherField, store.claims)
  );

  // #3 - updating store
  if (formState !== store.limitsForm) {
    store = { ...store, limitsForm: formState };
  }

  // #4 - processing ngrx actions
  switch (action.type) {
    case 'some action type':
      // modify state
      return store;

    default: {
      return store;
    }
  }
}
Vamos analisar de perto o código acima.
O bloco #1 é responsável por criar uma função reducer. É uma função que primeiro aplica uma ação ao estado e, em seguida, aplica todas as funções de atualização fornecidas, uma após outra, ao estado do grupo de formulários resultante. As funções de atualização mencionadas são definidas pelo método de fábrica createFormStateUpdateFunctions e é aqui que reside a principal parte da nossa lógica de validação. Vamos chegar a isso um pouco mais à frente.
O bloco #2 utiliza a função updateRecursive do ngrx-forms para aplicar mais algumas funções de atualização que estão separadas da lógica de validação. Aqui chamamos-lhes regras de negócio, embora tecnicamente continuem a ser “funções de atualização” do ngrx-forms que apenas não afetam a validade do formulário. Vamos utilizá-las para implementar os avisos importantes descritos nos nossos requisitos acima.
Os blocos #3 e #4 são código típico da maioria dos reducers ngrx, pelo que não são necessárias explicações aqui.
Validações
Já referimos a função createFormStateUpdateFunctions, que devolve um objeto com as nossas regras de validação. Dê uma vista de olhos no código:
Let’s closely look at the code above.
Block #1 is responsible for creating a reducer function. It is a function that first applies an action to the state and afterwards applies all given update functions one after another to the resulting form group state. The mentioned update functions are defined by factory method createFormStateUpdateFunctions and this is the main place where our validation logic is defined. We’ll get to it a little bit later.
Block #2 uses updateRecursive function of ngrx-forms to apply some more update functions that are separated from validation logic. We call them business rules here, though technically these are still some ngrx-forms “update functions” that just don’t affect validity of the form. We’ll use them to implement important tips described in our requirements above.
Blocks #3 and #4 are typical code for most ngrx reducers, so no explanations are needed here.
Validations
We already noticed the createFormStateUpdateFunctions function that returns an object containing our validation rules. Let’s have a look at it:
export const createFormStateUpdateFunctions = (): StateUpdateFns<LimitsFormValue> => ({
  overallLimit: updateGroup<EditableLimit>({
    limitValue: (state, parent) => {
      return validate([required, greaterThanOrEqualTo(0)], state);
    },
    limitValidToDate: (state) => validate([required, greaterThanNowPlus(0, 'day')(state)], state),
  }),
  workLimit: (workLimitState, rootState) =>
    updateGroup<EditableLimit>(cast(workLimitState), {
      limitValue: validate([
        required,
        greaterThanOrEqualTo(0),
        lessThanOrEqualTo(rootState.value.overallLimit.limitValue),
      ]),
      singleLimit: (state, parent) =>
        validate([required, greaterThanOrEqualTo(0), lessThanOrEqualTo(parent.value.limitValue)], state),
      premiumRate: validate([required, greaterThan(0), lessThanOrEqualTo(1000)]),
    }),
  criticalLimit: (criticalLimitState, rootState) =>
    updateGroup<EditableLimit>(cast(criticalLimitState), {
      limitValue: validate([
        required,
        greaterThanOrEqualTo(0),
        lessThanOrEqualTo(rootState.value.overallLimit.limitValue),
      ]),
      singleLimit: (state, parent) =>
        validate([required, greaterThanOrEqualTo(0), lessThanOrEqualTo(parent.value.limitValue)], state),
      premiumRate: validate([required, greaterThan(0), lessThanOrEqualTo(1000)]),
      limitValidToDate: (state) =>
        validate(
          [
            greaterThanNowPlus(0, 'day')(state),
            lessOrEqualToADate(rootState.value.overallLimit.limitValidToDate)(state),
          ],
          state
        ),
    }),
  solvency: updateGroup<Solvency>({
    question1: validate(required),
    question2: validate(required),
    question3: validate(required),
  }),
  debtEnforcementInfo: (debtEnforcementInfoState, rootState) =>
    updateGroup<DebtEnforcementInfo>(cast(debtEnforcementInfoState), {
      debtEnforcementNumber: validate([
        requiredIf(
          (value) => rootState.value.overallLimit.limitValue > EDIT_LIMITS_FORM_INITIAL_VALUE.overallLimit.limitValue
        ),
      ]),
      debtEnforcementSum: validate([
        requiredIf(
          (value) => rootState.value.overallLimit.limitValue > EDIT_LIMITS_FORM_INITIAL_VALUE.overallLimit.limitValue
        ),
      ]),
      issueDate: validate([
        requiredIf(
          (value) => rootState.value.overallLimit.limitValue > EDIT_LIMITS_FORM_INITIAL_VALUE.overallLimit.limitValue
        ),
      ]),
    }),
});
Regras de validação simples
Como pode reparar, a estrutura do objeto devolvido corresponde à interface do estado do formulário; na verdade, é estaticamente tipada, pois o seu tipo é StateUpdateFns<LimitsFormValue>, pelo que o compilador TypeScript não lhe permitirá colocar uma propriedade desconhecida. Também pode ver um conjunto de funções de validação como required, greaterThanOrEqualTo, lessThanOrEqualTo, greaterThan, etc. Existem muitas outras funções incorporadas e também pode escrever facilmente funções personalizadas para executar qualquer lógica de validação.
Campos dependentes
Ao executar as funções de atualização, o ngrx-forms pode passar o estado pai às funções, pelo que é muito simples aceder a qualquer uma das propriedades do estado do formulário. Dê uma vista de olhos no código:
Simple validation rules
As you can notice the structure of the returned object corresponds to the form’s state interface, it’s actually statically typed because its type is StateUpdateFns<LimitsFormValue> so typescript compiler won’t let you put some unknown property. Also you can see a bunch of validation functions like required, greaterThanOrEqualTo, lessThanOrEqualTo, greaterThan, etc. There’re lots of other built-in functions and you can also easily write custom ones to execute any validation logic.
Dependent fields
While executing update functions ngrx-forms can pass parent state to the functions, so it’s very straightforward to access any of the properties of the form’s state. Take a look at the code:
workLimit: (workLimitState, rootState) => updateGroup<EditableLimit>(cast(workLimitState), {
  limitValue: validate([
    required,
    greaterThanOrEqualTo(0),
    lessThanOrEqualTo(rootState.value.overallLimit.limitValue)
  ]),
  singleLimit: (state, parent) => validate([
    required,
    greaterThanOrEqualTo(0),
    lessThanOrEqualTo(parent.value.limitValue)
  ], state),
...
})
Estamos a utilizar o parâmetro rootState para aceder ao estado global, e o parâmetro parent conterá workLimit durante a execução. Absolutamente limpo e trivial!
Validação condicional
Como dissemos, pode escrever funções de validação personalizadas. Foi isso que fizemos para ativar a validação condicional “required”:
We’re using the rootState parameter to access the global state, and parent parameter will contain workLimit during execution. Absolutely clean and trivial!
Conditional validation
As we said you’re free to write custom validation functions. So we did to turn on conditional “required” validation:
declare type ExprFn<T> = (t: T) => boolean;

export function requiredIf<T>(expr: ExprFn<T>): (value: T | null) => ValidationErrors {
  return (value: T | null): ValidationErrors => {
    if (!expr(value)) {
      return {};
    }
    if (value !== null && (value as any).length !== 0) {
      return {};
    }
    return {
      required: {
        actual: value,
      },
    };
  };
}
Regras de Negócio Complexas
Já vimos como implementar a validação de formulários complexos com ngrx-forms. Agora vamos passar à lógica especial de que podemos vir a precisar para o nosso formulário. Chamamos a esta lógica “regras de negócio” e, para os nossos requisitos, vamos implementar alguns avisos úteis com base nos valores do formulário. Além disso, teremos de mostrar estes avisos apenas a determinados utilizadores, consoante as suas permissões.
Basicamente, não precisamos de alterar o valor do formulário quando a nossa lógica de negócio personalizada é executada. Mas precisamos de uma forma de guardar informação personalizada algures no formulário para lhe aceder mais tarde a partir da vista. O ngrx-forms inclui uma funcionalidade incorporada – “User Defined Properties” – que permite armazenar metadados adicionais num controlo. Encaixa perfeitamente nas nossas necessidades, por isso vamos tirar partido dela na nossa implementação.
Implementação
Lembra-se do nosso reducer com a chamada a updateRecursive? Em primeiro lugar, updateRecursive recebe um estado de grupo de formulários e um número variável de funções de atualização. Aplica todas as funções de atualização, uma após outra, ao estado recursivamente. Ou seja, a função é aplicada aos filhos do estado, aos filhos destes, etc. Assim, como pode ver, estamos a passar lá um conjunto de funções ...businessRules(store.someOtherField, store.claims).
Note que estamos a utilizar a função de fábrica businessRules para conseguir parametrizar as nossas funções de atualização com as propriedades someOtherField e claims.
A função businessRules na sua forma mais simples pode ser algo assim:
Complex Business Rules
We’ve already looked at how to implement complex form validation using ngrx-forms. And now let’s move on to the special logic that we might need for our form. We call this logic “business rules” and for our requirements we’ll implement some useful business tips based on the form values. Besides, we will need to show these tips for some particular users only, depending on their permissions.
Basically, we don’t need to change the form’s value when our custom business logic is executed. But we need a way to save some custom information somewhere in the form for accessing it later from the view. Ngrx-forms comes with a built-in feature – “User Defined Properties” that allows storing additional metadata on a control. It perfectly fits our needs so we’ll make use of it in our implementation.
Implementation
Remember our reducer with an updateRecursive call? First of all, updateRecursive takes a form group state and a variable number of update functions. It applies all update functions one after another to the state recursively. I.e., the function is applied to the state’s children, their children etc. So, as you can see we’re passing an array of functions there ...businessRules(store.someOtherField, store.claims).
Note that we’re using factory function businessRules to be able to parametrize our update functions with someOtherField and claims properties.
The businessRules function in its simplest form might look like this:
export let businessRules: (
  someOtherField: {},
  claims: Claim[]
) => Array<ProjectFn2<AbstractControlState<any>, AbstractControlState<any>>> = (someOtherField, claims) => [
  checkMaxOverallLimit,
  checkTotalValidTill(someOtherField),
  checkWorkSingleLimitExceedsDefault,
  checkWorkPremiumRateNotDefault,
  checkCriticalPremiumRateNotDefault,
  checkCriticalSublimitExceedsDefault,
  solvencyCheckBoxIsNo,
  checkQualityOrDebtEnforcement(someOtherField),
];
onde cada função é responsável por atualizar uma determinada “user defined property” consoante alguma lógica de negócio no seu interior. Por exemplo:
where every function is responsible for updating particular “user defined property” depending on some business logic inside. For example:
let checkMaxOverallLimit = (state: AbstractControlState<EditableLimit["limitValue"]>, parent: AbstractControlState<EditableLimit>) => {
  return setUserDefinedProperty("maxOverallLimitExceeded", state.value > 1000000, state)
};

let solvencyCheckBoxIsNo = (state: AbstractControlState<any>, parent: AbstractControlState<any>) =>
  setUserDefinedProperty("solvencyCheckBoxIsNo", state.value === false, state);

...
Ok, mas esta implementação vai executar cada “função de atualização” para cada controlo do formulário recursivamente, o que está errado, por isso temos de associar de alguma forma a regra de negócio ao controlo do formulário. Eis uma das possíveis soluções para o fazer: podemos introduzir uma classe chamada BusinessRule com um método wrapper simples que vai executar a função por detrás da regra se esta corresponder a um determinado controlo do formulário. Dê uma vista de olhos:
Ok, but this implementation will execute every “update function” for every form control recursively which is wrong, so we must somehow stick the business rule to the form control. Here’s one of the possible solutions to do so: we can introduce a class called BusinessRule with a simple wrapper method that is going to execute the function behind the rule if it corresponds to some particular form control. Let’s take a look:
class BusinessRule<T> {

  constructor(private _formId: string, readonly value: ProjectFn2<AbstractControlState<T>, AbstractControlState<any>>) {
  }

  applyTo(path: string): Rule<T> {
    return new Rule<T>(this._formId, (state, parent) => {
      if (`${this._formId}.${path}` === state.id) {
        return this.value(state, parent);
      } else return state;
    })
  }
}
...
As funções businessRules seriam transformadas em:
The businessRules functions would be transformed into:
export let businessRules: (
  someOtherField: {},
  claims: Claim[]
) => Array<ProjectFn2<AbstractControlState<any>, AbstractControlState<any>>> = (someOtherField, claims) => [
  new Rule(EDIT_LIMITS_FORM_ID, checkMaxOverallLimit).applyTo('overallLimit.limitValue').value,

  new Rule(EDIT_LIMITS_FORM_ID, checkTotalValidTill(someOtherField)).applyTo('overallLimit.limitValidToDate').value,

  new Rule(EDIT_LIMITS_FORM_ID, checkWorkSingleLimitExceedsDefault).applyTo('workLimit.singleLimit').value,

  new Rule(EDIT_LIMITS_FORM_ID, checkWorkPremiumRateNotDefault).applyTo('workLimit.premiumRate').value,

  new Rule(EDIT_LIMITS_FORM_ID, checkCriticalPremiumRateNotDefault).applyTo('criticalLimit.premiumRate').value,

  new Rule(EDIT_LIMITS_FORM_ID, checkCriticalSublimitExceedsDefault).applyTo('criticalLimit.limitValue').value,

  new Rule(EDIT_LIMITS_FORM_ID, solvencyCheckBoxIsNo).applyTo('solvency.question1').value,

  new Rule(EDIT_LIMITS_FORM_ID, solvencyCheckBoxIsNo).applyTo('solvency.question2').value,

  new Rule(EDIT_LIMITS_FORM_ID, solvencyCheckBoxIsNo).applyTo('solvency.question3').value,

  new Rule(EDIT_LIMITS_FORM_ID, checkQualityOrDebtEnforcement(someOtherField)).applyTo('debtEnforcementInfo').value,
];
Também podemos ajustar a nossa classe BusinessRule para funcionar com as permissões do utilizador, por exemplo, criar um método wrapper que aplica um método de atualização apenas se uma determinada permissão estiver presente (ou ausente, no nosso caso):
We could also adjust our BusinessRule class to work with user’s permissions as well, e.g. create a wrapper method that applies an update method only if some permission is present (or absent in our case):
class BusinessRule<T> {
  constructor(
    private _formId: string,
    readonly value: ProjectFn2<AbstractControlState<T>, AbstractControlState<any>>
  ) {}

  ifNoPermission(permission: Permissions, claims: Claim[]) {
    return new Rule<T>(this._formId, (state, parent) => {
      let permissionExists = claims.find((x) => x.type === ClaimTypes.permission && x.value === permission);
      if (!permissionExists) {
        return this.value(state, parent);
      } else return state;
    });
  }

  applyTo(path: string): Rule<T> {
    return new Rule<T>(this._formId, (state, parent) => {
      if (`${this._formId}.${path}` === state.id) {
        return this.value(state, parent);
      } else return state;
    });
  }
}
Finalmente, a lista businessRules será:
Finally, the businessRules list will be:
new Rule(EDIT_LIMITS_FORM_ID, checkMaxOverallLimit)
    .ifNoPermission(Permissions.approveLimits, claims)
    .applyTo("overallLimit.limitValue").value,
new Rule(EDIT_LIMITS_FORM_ID, checkTotalValidTill(someOtherField))
    .ifNoPermission(Permissions.approveLimits, claims)
    .applyTo("overallLimit.limitValidToDate").value,
    ...
Assim, teremos “propriedades de utilizador” específicas definidas para controlos específicos do formulário, o que torna bastante fácil utilizá-las nas vistas para apresentar alguns avisos.
Conclusão
Como viu, os formulários complexos podem ser bastante dinâmicos, contendo um conjunto de validações dependentes e lógica de negócio no seu interior. Felizmente, com a ajuda do ngrx-forms é bastante fácil implementar vários casos de utilização, desde validações simples até regras de negócio personalizadas. Esperamos que este artigo lhe seja útil; siga-nos no Facebook para estar a par dos artigos mais recentes!